Wednesday, March 9, 2011

And the WINNER IS........

First, we want to thank everyone who joined in this giveaway.  We wish we had a gift for each one of you.  And also, we are very appreciative of all our new followers.  So, without further ado, the first place winner is
Oops, is that part of the prize in the bowl? hehehehe

Me pulling the names.
Brenda from The Rusty Thimble!!!!!!  Congrats Brenda.  And we added a second prize.  The winner of that is....
Linda at Meadowbrook Cabin Primitives.  We just need your mailing addresses, Brenda and Linda, and the packages will be on their way.  When you get them, we need you to post a picture of what you received so that everyone else can see too.

Thanks again ♥♥♥


Monday, March 7, 2011

I'm Rag Quilting Again

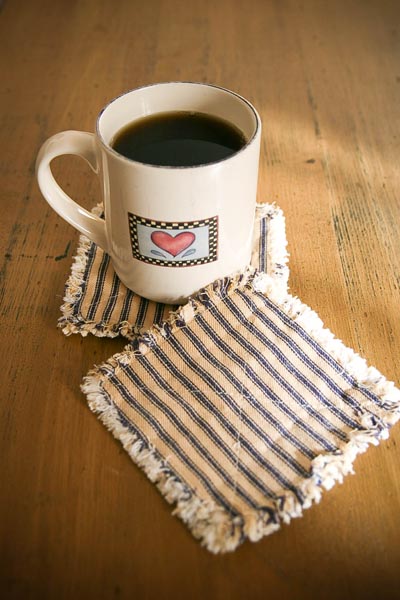
I think the method of rag quilt is 'my thing'.  I put together a bunch of Rag Quilt mug rugs.

I made them with two layers.  The bottom layer is a flannel, so they are absorbent, and soft to protect furniture.  I couldn't stop making them and have extras so I'm going to take my first step in the direction of selling some of my wares.  (I'm not sure why, but it makes me a little nervous) I am offering these up, $5.00 for the pair and shipping is free.
Blue Ticking ~SOLD~ 
 If anyone is interested, you can email me lorisimard@gmail.com

Also, one last reminder for our giveaway!!!!  There is only one day left to sign up.  Heather and I can't wait to draw the name of the lucky winner.


Thursday, March 3, 2011

Grubbied Up with Wax and Spices

Oh, yet another morning of crafting fun with Heather.  She treated us to homemade banana bread!  One of my favorites.  To my surprise, she put together a little gift for helping her with her blog!  It was a great surprise.  She gave me some of her salt dough ornies, bunnies and eggs, a bundle of clothes pins, a rusty star, blown eggs, an old hanger and a jar candle!!!  Carmel drizzled popcorn!
This is what I did with hanger.  The dress that is hanging on it is a Christening gown that has been in my husbands family.  All three of my sons wore it for their Christening.  Between the colour of the walls, the wood and the fabric, I think it looks good here.

I went to Heather's with a purpose, to make grungy tapers and clothes pins.  I have to say, it's not one of my favorite things to do, but the results were good.  It took us a few tries to get just the look we were both happy with.  Heather seemed to have just the right technique, so I let her take over and I manned the camera. I kind of disappeared on her a few times. LOL  Here is the link to her post about it.  Grubby candles  Here are a few photos of the ones I brought home.  And they smell delicious!


Just another reminder of our giveaway.  The count down is on.  5 days left to get in on it!


Another Rag Quilt

I finished up this one for a Christmas gift for my mother.  I couldn't post it at the time because she visits my blog and that would have spoiled the surprise. lol  And surprised she was.  She had been hinting she wanted one for a long time.
The squares on this one are two layers, (you can see the 'x' I sewed through them).  The solid colours are flannel and the printed squares are a cotton.

I'm off to Heather's again.  Today we are doing something I have been wanting to do for a while.  We are going to wax and grubby some candles and clothes pins.  I've been putting off doing it because of the mess.  It will be more fun making a mess when you have someone else to help clean it up. LOL 


Tuesday, March 1, 2011

Running Rabbit Make -Do

I finally got around to making up this make-do.  I saw the tutorial for it, as well as the pattern at Lynne's blog, ♥ A Simpler Time ♥  I love her blog!  I made him out of some vintage fabric and have him on my mantel.
Displayed with him are some of the eggs I made with Heather yesterday.  These are small plastic eggs that we coated in craft glue and rolled in a coffee/cinnamon mixture.

I couldn't decide were to display them.  They look good here and I also had them on my windowsill above my sink, right next to the sunflower my sun planted and grew at school and gave to me for Valentine's day. *Ahhhhh*  I think I will have to make more to put in both places. (sorry about the back light in this picture.  But the sun is actually shining today! Yahoo!)
I put the some of the fabric wrapped ones on my stove board.  I cut up an egg carton, grubbied it up a little and put them in there.  We first found this idea at Libbie's Home.
One more thing I wanted to share with you.  Back in the fall, when everything was dying off, I cut my (already dried and dead) sunflowers and tucked them away for when inspiration struck me.  I put a few stems in this jug.  I am also going to cut some of the heads off the stems, shower them with a prim scent and use them as a bowl filler.

Ok, I lied. One last note, don't forget to sign up for our first ever giveaway.  I know there are a lot of exciting ones out there right now.

A Whopper of a Giveaway


It's going to be like Christmas in Spring for the lucky person that wins this giveaway.  The
Primitive and Folk Artists Etsy Team has gotten a "few" (21) handmade items together for this giveaway.  Click on the picture to take you to their blog and giveaway.

Saturday, February 26, 2011

Cut, Sew, Snip, Wash

I've finished another rag quilt.  I really enjoy making these.  Heather (from BitterSweetAndPrim) had a piece of flannel fabric she gave me to create something for her.  A rag quilt was the first thing that came to mind.  I like using flannel to make them but any cotton will work.  It has to be a fabric that will fray to give a nice fringe look to the raw edges.  I usually make them with two layers, but in this case, I didn't have enough coordinating fabric, so this one is just one layer.  Two layers would make it warmer, for actual usage, and also add to the fringe. It still looks just as good and is just being used for decorationg. Here's the process I went through to create it.

First step is to cut out squares.  The size is total preference.  I used a 5" square.  Keep in mind, you will be sewing a 1/2" seam around the square, so the finished square will be a little smaller. 

Then you need to lay out your design.  Since I'm just using the two colours, that was the easiest part.

Stack up the squares in each row and it's off to the sewing machine.  If you are using two layers, you need to sew and "X" from one corner to the other, to attach the two layers together. (wrong sides together) Then you will first sew the rows of squares together with a 1/2" seam.  Lay them WRONG sides together.  This will bring your seam to the front of the quilt.  That's what you want.  Total opposite to making a traditional quilt. Your finished product will be strips of squares.


Lay your pieces out again.  Then gather them up in order and it's off to the sewing machine again. 

Now your going to sew your strips together with a 1/2" seam, wrong sides together, in the order you gathered them up.  When your done this step, the quilt is completely assembled.


It's looking a little funky, but now we will release those corners.  It's time to create the fringe.  To do this, I recommend spring loaded scissors.  It really saves your hand.  These are the pair I use.


You have to snip the fringe about 1/4" apart, but take care not to cut through the seam or you will have it coming apart.  Where your squares meet, cut just along the side of the seam.


I find this part of the quilt, takes the longest.  Here it is, all clipped up and you'll be left looking like the sewing room floor.  Lots threads all over you.


Here's the back side.

Now you have to wash it.  Your going to get a lot of thread come off of it during this process.  My washing machine empties into a laundry tub, so I have a lint catcher on the end of the tube that comes out of the washing machine.  It catches all the loose threads in the water.  I put a couple of towels in with it as well, to help fringe it even more.  Then it's into the dryer.  Make sure you clean out your lint tray before and after.  Trust me, it's going to be full.  The more you wash it, the more it's going to fray.

Here is the finished product.  It finished sized ended up being 35"x44" (11 squares x 9 squares)


Thursday, February 24, 2011

A little fabric

As I posted before, I spent some time at Heather's house this morning.  I always love going over there.  It seems not a day goes by that we don't talk to each other.  Now that I've introduced her to blogging, we have even more to talk about.  So fun!!!  I brought home some extra fabric she had and am going to make a rag quilt for her.  I usually make the quilts with two layers but I'm not sure I have enough fabric to do that this time.  Since it's just going to be more for decorating rather than keeping her warm, it will be more like a quilt top.  I hope it turns out because I hate ripping seams and starting over. lol  I'll take pictures as I go and see if I can make it into a tutorial. Here's the fabric I'll be using.

A Meeting of the Minds


I stopped over at Heather's (my cousin) house today.  She let me help her move some furniture around.  That was so much fun.  Then we sat down in front of the fire, with coffee in her super cute prim cups, and discussed what we are including in our giveaway. We find the number of people that have entered and positive feed back from everyone so overwhelming.  We are very grateful and feel that if this keeps up we will be more than happy to include a SECOND PRIZE!!! So don't forget to sign up for our giveaway and pass the word.  Here's the link to my post about it. Teaming Up Giveaway  We are so excited about it and hope you are too!!!!